

Introduction
Database Schema Migration is the process of updating a Collection Schema and/or adapting the existing data for new requirements.
The objective of this post is to learn about the different ways a migration tool can help us to write scripts that modify your database by adding new documents, modifying existing ones, or changing the collection schema.
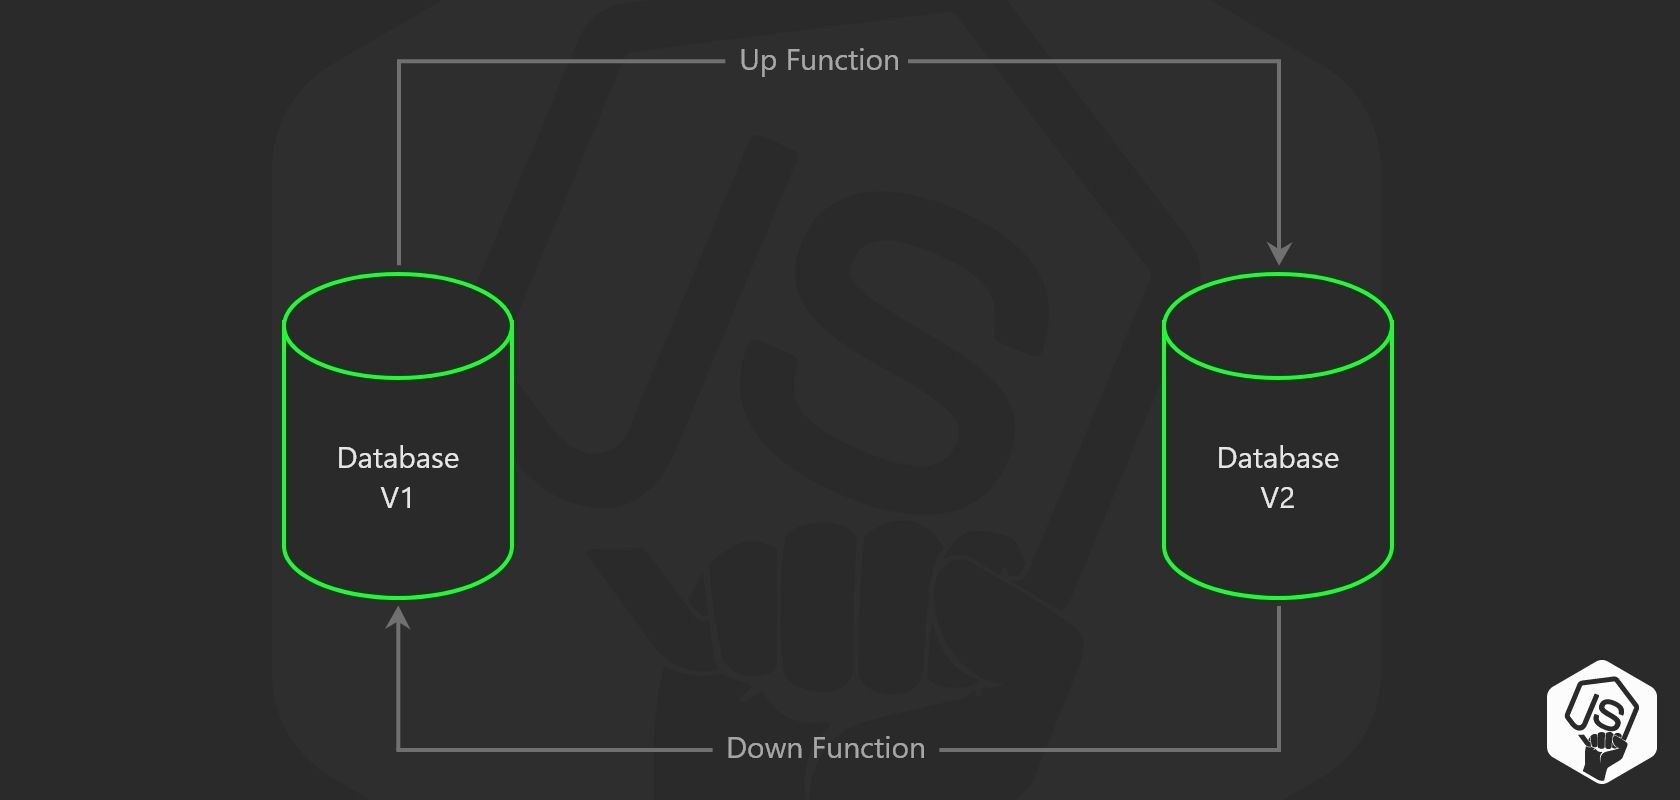
Table of Contents
- This is why you need a migration tool for MongoDB.
- Use Cases
- Using the migration tool
- Run migrations automatically after each deploy to the cloud
- Conclusion
- Example repository
This is why you need a migration tool for MongoDB
We know that mongo is a non-relational database schema-free database, but in most of the projects, we tend to use it with Mongoose, a popular ODM for MongoDB which allows us to add Schema to our collections.
And as software evolves, we may need to fix mistakes on the data schema or adapt existing data as requirements change.
Now the problem is that we can't rely on running manual update commands on the MongoDB shell since that is prone to errors or some times we need a special tool like lodash or moment to perform some modifications to dates or arrays.
Also, when we need to perform several updates that have a special order, it is pretty common to mix those up and broke the data.
The solution is to use a specialized tool, such as the npm package migrate-mongo
This way we will have an incremental, reversible, and version-controlled way to handle database schema migrations.
Example of use cases
Let's explore some use cases for MongoDB migrations:
-
Adding new relations to existing collections. For example, in an e-commerce app, you added a new entity like 'brand' and now you need to update certain 'products' to have a relation to that brand.
-
Renaming fields. Useful when you need to change a field that, for example, was named
createdand now will besignupDate. -
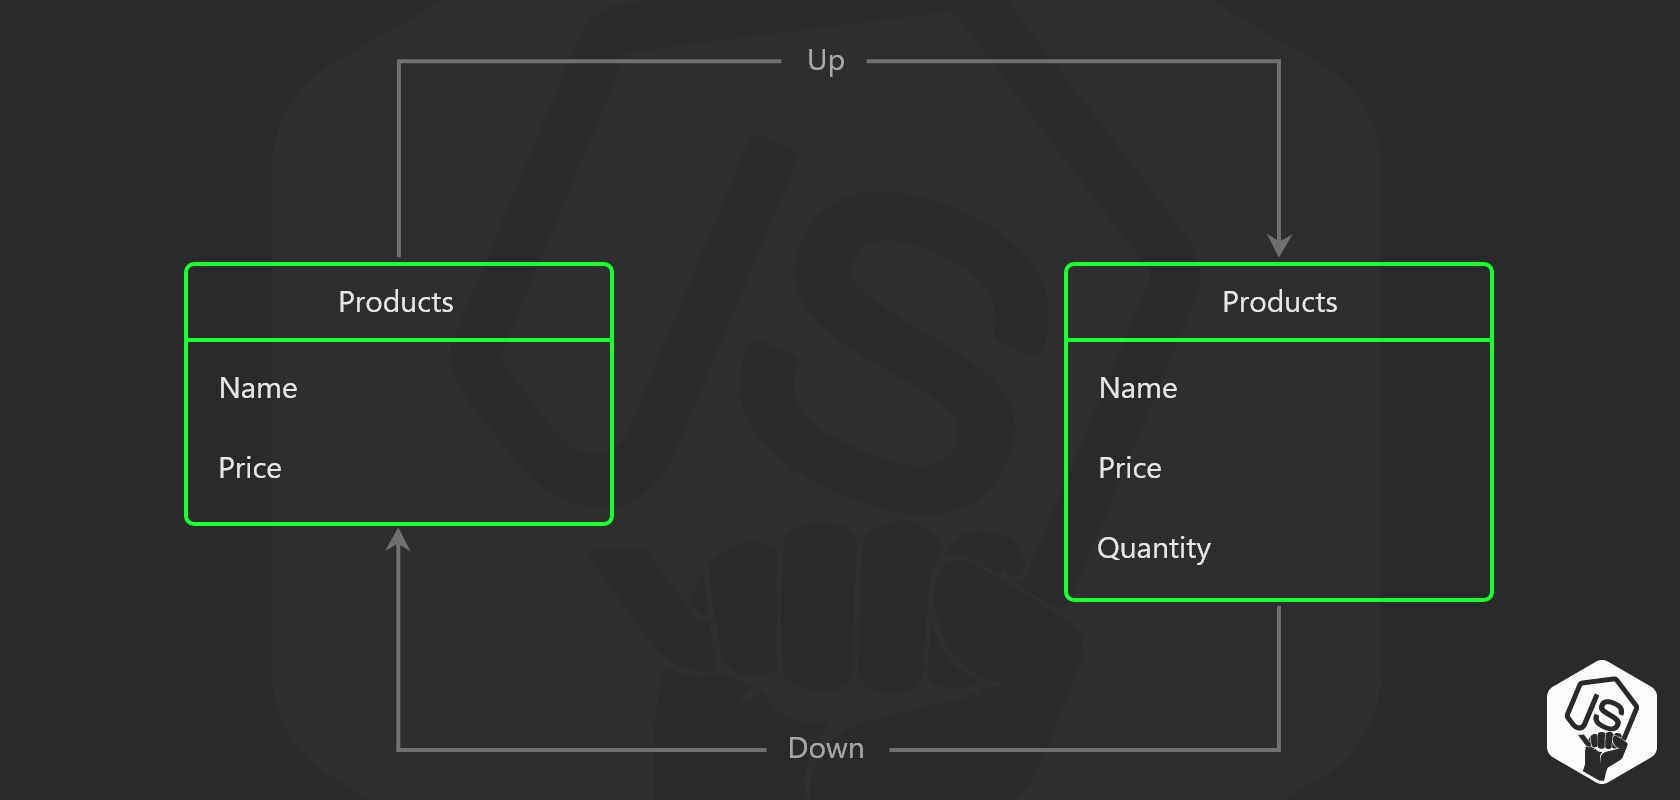
Adding fields to existing documents. Sometimes (or a lot of times) as your app grows you, find that the database schemas you designed the first time need to be expanded.
For example, adding a field quantity to a products table in order to model the current stock.
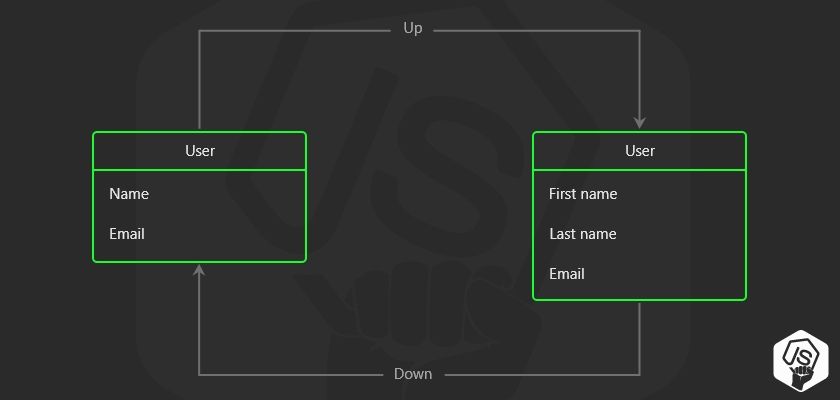
- Separating fields into new document properties. A classic example is having a field
namethat now is divided intofirstNameandlastName
Using the migration tool
While there is a variety of tools to perform migrations, my favorite is migrate-mongo because it's well documented and actively developed.
To install it:
npm install -g migrate-mongoI installed it globally, but you can also install it locally on your project and then invoke it from an npm command (see about it in next section)
Or you can even use npx to avoid installing it on your server.
Let's now see how to use it.
The first step is to init the migrations tool
migrate-mongo initThis will create a migrate-mongo-config.js configuration file and a migrations folder at the root of our project.
|_ src/
|_ migrations/
   |- 20200606204524-migration-1.js
   |- 20200608124524-migration-2.js
   |- 20200808114324-migration-3.js
|- migrate-mongo.js
|- package.json
|- package-lock.json
Migrate-mongo configuration file
In the configuration file, we can define our database URL, I have it stored on a config file in another folder, where it loads it depending on the environment (such as local, staging, production) Also, we can change the MongoDB connection parameters, and finally, in which collection, the current database version will be saved.
// In this file you can configure migrate-mongo
const env = require('./server/config')
const config = {
  mongodb: {
    // TODO Change (or review) the url to your MongoDB:
    url: env.mongo.url || "mongodb://localhost:27017",

    // TODO Change this to your database name:
    databaseName: env.mongo.dbname || "YOURDATABASENAME",

    options: {
      useNewUrlParser: true, // removes a deprecation warning when connecting
      useUnifiedTopology: true, // removes a deprecating warning when connecting
      //   connectTimeoutMS: 3600000, // increase connection timeout up to 1 hour
      //   socketTimeoutMS: 3600000, // increase socket timeout up to 1 hour
    }
  },

  // The migrations dir can be a relative or absolute path. Only edit this when really necessary.
  migrationsDir: "migrations",

  // The MongoDB collection where the applied changes are stored. Only edit this when really necessary.
  changelogCollectionName: "changelog"
};
module.exports = config;
Migrations folder
Inside the migrations folder, our scripts will be sorted by date.
The date is appended to the beginning of the file name.
|_ migrations/
   |- 20200606204524-change-name-to-full-name.js
   |- 20200608124524-add-user-default-picture.js
   |- 20200808114324-remove-old-property.js
   |- 20210108114324-change-password-hashing.js
That way the tool ensures us the scripts will be run in order.
Adding a migration
To add a new migration script, use the CLI command
migrate-mongo create name-of-my-scriptA new file will be created with a corresponding timestamp.
|_ migrations/
   |- 20210108114324-name-of-my-script.js
The up function
The script file expects us to export an object with a UP function and a DOWN function.
When the scripts are applied, the up function is responsible for changing the database schema.
module.exports = {
    function up(db) {
        return db.collection('products').updateMany({}, { $set: { quantity: 10 } })
    }

    function down(db) {
        return db.collection('products').updateMany({}, { $unset: { quantity: null } })
    }
}
But don't limit yourself by this simple file, it is a regular js file where you can import/require any library that you need (lodash.js / moment.js / etc)
Here is an example that sets an additional field that needs to be calculated using moment.js
const moment = require('moment');

module.exports = {
    async   function up(db) {
    const products = await db.collection.get('products').find({}).toArray();
        const operations = products.map((product) => {
            return db.collection('products').updateOne({ _id: product._id }, {
                    $set: {
                        weekDay: moment(product.date).day()
                    }
            })
        })
        return Promise.all(operations);
    }

    function down(db) {
        return db.collection('products')
                    .updateMany({}, { $unset: { weekDay: null } });
    }
}
The down function
This is how you go back to the previous database state.
module.exports = {
    function up(db) {
        return db.collection('users').updateMany({}, { $rename: { name: "fullName" } })
    }

    function down(db) {
        return db.collection('users').updateMany({}, { $rename: { fullName: "name" } })
    }
}
It is not always possible to go back to the previous state
module.exports = {
function up(db) {
return db.collection('users').deleteMany({ name: /Sam/ })
}
function down(db) {
// But we can't recover deleted documents...
return Promise.resolve('ok')
}
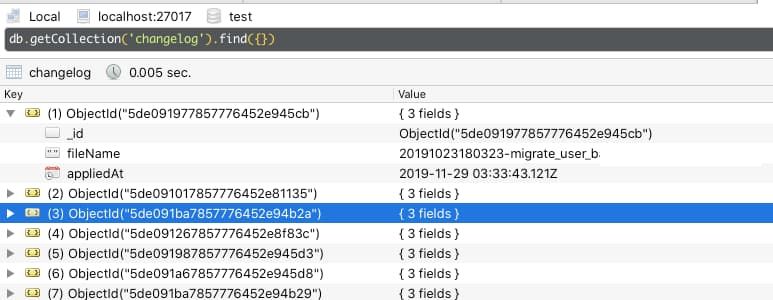
}The database changelog
In order to know the current database version and which migration should apply next, there is a special collection that stores the database changelog with information such as migrations applied, and when where they applied.
Running migrations
To run your migrations, simply run the command
migrate-mongo upAlso, you can add it to your package.json as an npm script
{
    "scripts": {
        "migrate:up": "migrate-mongo up",
        "migrate:down": "migrate-mongo down"
    }
}
This up command will run every migration that wasn't already applyied to your database.
It uses the changelog collection to know the current database state and version.
To rollback a migration use the down command:
migrate-mongo downThis will only roll back one single migration, the latest applyied.
Automated migrations
The way to run this on your production/staging server is by using a simple script after the npm install and before the start of the server
Heroku
According to Heroku's documentation for node.js you may specify a post-build script that is executed every time a new update is sent.
Inside your package.json
"scripts": {
  "heroku-postbuild": "migrate-mongo up",
}
You can read more about Heroku build steps here:
https://devcenter.heroku.com/articles/nodejs-support#heroku-specific-build-steps
Digital Ocean
On D.O things vary depending on your setup, but what we aim is to execute the migrate tool after the node.js dependencies installation process, but before starting up the node.js application.
For example, here is a bash script that can be executed by login-in through ssh into the digital ocean droplet.
# Go to the app folder
cd ~/apps/my-app
# Install all dependencies
npm install
# Run migrations
migrate-mongo up
# Restart the node.js app
pm2 restart my-app
Conclusion
By using a database schema migration tool you will archive incremental, reversible, and version-controlled way to apply schema and data changes.
With the tool migrate-mongo we can have all of that and if we combine it with the power of continuous delivery applyied to Heroku or Digital Ocean we are ready to scale!

